Friday, December 14, 2018

How to fix Error: Could not find update-config.json. Run 'webdriver-manager update' to download binaries.

While running Protractor test if you see error:
[17:05:22] I/launcher - Running 1 instances of WebDriver
[17:05:22] I/direct - Using ChromeDriver directly...
[17:05:22] E/direct - Error code: 135
[17:05:22] E/direct - Error message: Could not find update-config.json. Run 'webdriver-manager update' to download binaries.
[17:05:22] E/direct - Error: Could not find update-config.json. Run 'webdriver-manager update' to download binaries.
    at Direct.getNewDriver (C:\automation\Demo\protractor-jasmine-typescript\node_modules\protractor\built\driverProviders\direct.js:63:31)    at Runner.createBrowser (C:\automation\Demo\protractor-jasmine-typescript\node_modules\protractor\built\runner.js:195:43)
    at q.then.then (C:\automation\Demo\protractor-jasmine-typescript\node_modules\protractor\built\runner.js:339:29)
    at _fulfilled (C:\automation\Demo\protractor-jasmine-typescript\node_modules\q\q.js:834:54)
    at self.promiseDispatch.done (C:\automation\Demo\protractor-jasmine-typescript\node_modules\q\q.js:863:30)
    at Promise.promise.promiseDispatch (C:\automation\Demo\protractor-jasmine-typescript\node_modules\q\q.js:796:13)
    at C:\automation\Demo\protractor-jasmine-typescript\node_modules\q\q.js:556:49
    at runSingle (C:\automation\Demo\protractor-jasmine-typescript\node_modules\q\q.js:137:13)
    at flush (C:\automation\Demo\protractor-jasmine-typescript\node_modules\q\q.js:125:13)
    at _combinedTickCallback (internal/process/next_tick.js:131:7)
[17:05:22] E/launcher - Process exited with error code 135
npm ERR! Test failed.  See above for more details.
PS C:\automation\Demo\protractor-jasmine-typescript>

You can fix this error by running command, by going into your root project directory:
node node_modules/protractor/bin/webdriver-manager update

Monday, November 26, 2018

How to Format code in Visual Studio Code

Auto-format your code in Visual Studio Code


If you want to auto-format your code in Visual Studio Code you have to enable the setting.
1.  Go to File > Preferences > Settings

2. In Search, bar enter formatOnSave

3. Checkmark the setting and it will automatically save the setting
4. Close and reopen Visual Studio Code

Format Document of code in Visual Studio Code

1. Double click and open TypeScript or JavaScript document
2. Right click on the document
3. Select Format Document option

Shortcut key to format document is Shift+Alt+F

Format Selection of code in Visual Studio Code

1. Double click and open TypeScript or JavaScript document
2. Select the code you want to format
3. Select Format Selection option

Shortcut key to format document is Ctrl+K Ctrl+F

You are Done!!!

Write first test in Protractor using TypeScript

Write first test in Protractor using TypeScript. We will start create simple folder structure so that finally we have automation framework.

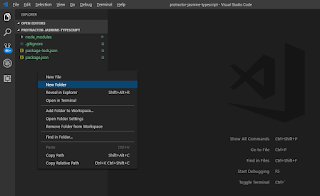
1. Open Visual Studio Code
2. Right click on Explorer
3. Select New Folder option

4. Name the folder as specs and hit enter key

5. Select specs folder and right click
6. Select New File option
7. Name the folder as first.spec.ts and hit enter key

8. Lets write simple test

9. Create conf.ts in root folder and add these lines

10. Now, in order to run your first.spec.ts you have to Compiling your code, to do that you have to run command

This will compile the code and keep it in folder named temp and then it will start the test on browser.

Done!!!

Sunday, November 25, 2018

How to create tsconfig.json

The presence of a tsconfig.json file in a directory indicates that the directory is the root of a TypeScript project. The tsconfig.json file specifies the root files and the compiler options required to compile the project.

1. Open Visual Studio Code
2. Click on Terminal menu
3. Click 'New Terminal'
4. You will see that Terminal is open at the bottom-most screen of Visual Studio Code
5. Run below command


This will create a tsconfig.json file in your directory where you can define your configuration. VSCode will also start using this file once it finds it in your root directory.

6. We have to compile TypeScript file so that it converts them into JavaScript file. It will keep all the complied files in temp folder. We are not going to compile node_modules, so we have to exclude.

7. Finally you should update your tsconfig.json file as

Done!!!

How to create .gitignore in your project root directory

If you create a file in your repository named .gitignore, Git uses it to determine which files and directories to ignore, before you make a commit.

A .gitignore file should be committed into your repository, in order to share the ignore rules with any other users that clone the repository.

GitHub maintains an official list of recommended .gitignore files for many popular operating systems, environments, and languages in the github/gitignore public repository. You can also use gitignore.io to create a .gitignore file for your operating system, programming language, or IDE.

1. Open Visual Studio Code
2. Right click on project Explorer
3. Click New File
4. Name the file as .gitignore
5. Double click the file and open it
6. Enter enter the folder or file type which you want to ignore while checkin
7. Save changes

Done!!!

Reference:
https://help.github.com/articles/ignoring-files/
https://github.com/github/gitignore

Saturday, November 24, 2018

How to create a package.json file in project

Creating a default package.json file

To create a default package.json using information extracted from the current directory, use the npm init command with the --yes or -y flag

You can create package.json from the command prompt or directly from Visual Studio Code.

1. Open Visual Studio Code
2. Click on Terminal menu
3. Click 'New Terminal'
4. You will see that Terminal is open at the bottom-most screen of Visual Studio Code
5. Run below command

6. Default package.json file created will look something like

Updating package.json file

You can update the 'description' and 'author' as per your need manually or you can run below commands.

Setting config options for the init command


Saving npm dependencies in package.json file

1. Run below commands one by one so that it gets saved in package.json file and later it will be easy for us to install all dependencies by giving one commend.

2. If you run command npm install then it will install all the dependency in one go and it will save your time in typing individual command when you are deploying code on another system.
Finally you can update the package.json file as below

Done!!!

Install or Update WebDriver Manager

To install the required jar and driver for Selenium WebDriver when using Protractor automation too you have to install WebDriver Manager which downloads all the required jar and driver.

You can install WebDriver Manager from the command prompt or directly from Visual Studio Code. This is one of the powerful features which I like most in VSCode.

1. Open Visual Studio Code
2. Click on Terminal menu
3. Click 'New Terminal'
4. You will see that Terminal is open at the bottom-most screen of Visual Studio Code
5. Run below command

Done!!!

1. I would recommend installing WebDriver Manager and any other library in your root project directory.
2. Ignore any warning you see in terminal while installing WebDriver Manager. 3. If you see any error while installing WebDriver Manager then close Visual Studio Code and run webdriver-manager update command again.